This will be the most Nerdy music for a wedding ever but it's exactly what I wanted in my dream wedding. Majority of it is Final Fantasy Tracks.
Crystal Theme and Terra while people are being seated on the Organ
Aria di Mezzo Carattere for the wedding processional on the Harpsichord
After we a re pronounced Husband and Wife for the Recessional we have the Victory Fanfare and Prologue from FFVII on the Organ once again
Tuesday, June 21, 2011
Tuesday, June 7, 2011
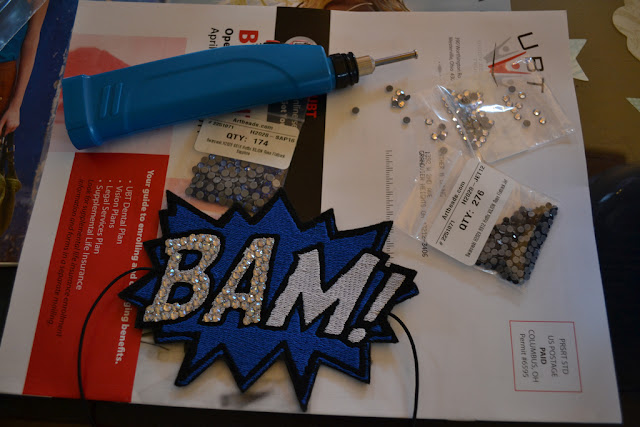
Headpiece
Instead of a normal Veil if you remember I wanted a unique headpiece. I received it in the mail a few weeks ago from the UK Etsy Seller Janine Basil. I love her crystal encrusted versions (around $125) but I just couldn't spend that much money on it so I settled for the plain base for $25.00 and then added the crystals myself.
A lot of DIY projects are only worth it for either sentimental value or to save money. If it is for the later like me on most things for this wedding timing is everything. I knew that I got coupons periodically from Artbeads.com and so I bid my time waiting for those sweet savings before I made my order.

I chose 3 different colors for my crystals. A blue that matched closely to the blue on the embroidery, a moonlight crystal and jet black rhinestones. I decided to make it easy for myself and got the "hotfix" kind that come with a adhesive on the back already that melts and sets with an rhinestone setting heat tool. My rhinestones were in total around $55 and the tool was about $3.00 with a coupon from Joanne's. So I saved about $40-50 bucks doing it myself and it was fun!


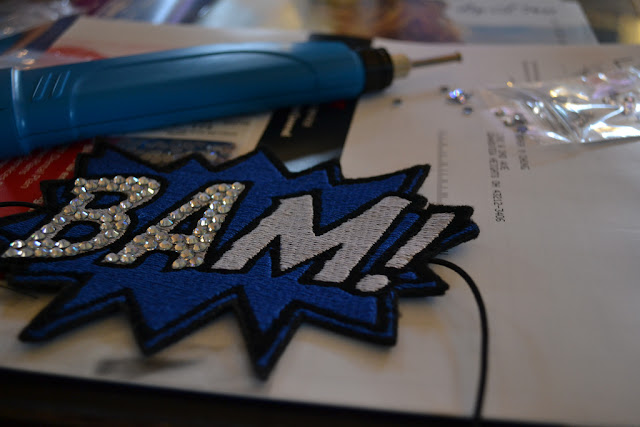
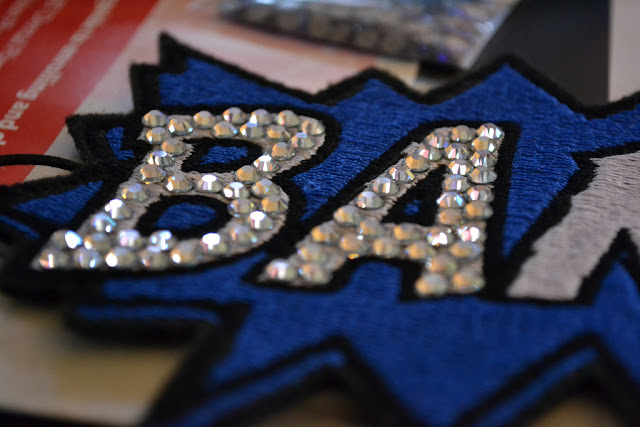
Below is my finished result. I used 2 different sized stones as well, smaller for the black outlines and larger for the fill in. I got quite a few variants of stone sizes before settling down on what I got. Bigger is not always the best way to go for fillers because then you lose some of the detail. Yet I knew I didn't want to go tiny either because I would of hated myself trying to set all those stones. Doing the smaller black size was a pain as it was. It is nice to have the definition also of the contrast between the filler and outline stones.


Monday, June 6, 2011
National Advertisement!
I had the pleasure of being featured in a National advertisement with Brother sewing machines in Women's Day Special on Budget Weddings. I still can't believe that I am the entire back cover, it is just amazing and I feel it puts me one step closer to achieving some of my goals for sewing and fame.


Tuesday, April 26, 2011
A few Words on the Dress
I chose to design and make my own wedding dress for several reasons. First since I am a designer so it only made sense that I make my own dress. Second the style of dress that I wanted is not something easily found in the United States, I wanted to mix my Korean heritage with western wedding traditions. Third it saved a lot of money and headache, I didn't have to deal with a sales person, or another seamstress fitting me and getting it wrong. Making my own dress I make all my decisions and I'm not locked into just one thing. I can change it as many times as I'd like and play with the shape and embroidery and fabrics till I feel it is perfect.
As for saving money by making your own dress a lot of garment making pays into labor more then materials depending on the complexity of the piece. If you know exactly what you want then it can easily save money by researching the fabrics to find the best price. You are obviously saving money because you aren't paying for anyone else to do labor also. On the Flip side it can also easily be a pitfall to spend just as much if you are indecisive because you will start to sample everything and want to try everything.
My advice is to keep in mind what is more important to you the materials themselves or the look you are trying to create. Don't drastically change the entire design of the dress more then once. Don't try to take on something new you haven't done before in sewing. If you do decide you have to do those fancy french seams do another project first to practice. Always make a muslin/mock up out of a similar fabric first before you go head on into your final fabric. Last is to relax, yes that seam may not be perfect but it is also on the interior 3rd layer of tulle that no one else will ever see. We are only human and you can't get hung up on small mistakes as long as the final product looks gorgeous on you. Your wedding dress is just one in a million of things you need to do for your big day don't let it get you down. The Sewing should be your most enjoyable experience!
Monday, April 4, 2011
The Wedding Dress Saga Continues
So the work on my wedding dress continues.
I have finished the embroidery for the bodice top of the dress. It was a total pain and I admittedly cried several times when there were snags or mishaps in the positioning and hooping. Just like in regular embroidery you have to hoop the fabric for machine embroidery. You want everything to be perfect and precision. The embroidery itself only does a set of two flowers at a time, There was a lot of trial and error to figure out how to hoop over previous embroidery without making the frame pop out of the hoop. I also started with no stabilizer and a single basting stitch down the length. Both were bad calls. After the first two sets were done I knew I needed at least a tear away stabilizer to help keep the hoop from popping out against the slippery organza. Then I also added rows of horizontal basting stitches across the first length wise basting stitching to give the two layers of organza more stability. After that it was all about marking and repositioning before the next set of flowers. One time my heart stopped as I was working on it and the boy didn't realize I was there and turned the lights off which also turn the power off in the studio.

 I'm really happy with how it turned out, now I just need to remove the rest of the tear away stabilizer and the basting stitches. I've decided to use cotton sateen for lining of the dress. I've still got a long way to go
like figuring out my closure if I want it to be hook and eye tape, invisible zipper or what. Also since this is strapless how to keep it up. I think I am going to use a combination of lingerie elastic that has the slightly sticker side like on strapless bras and maybe retro fit a strapless bra into it as well.
 I've also finished one row of the three rows of pleats for the bottom. This is the middle section of pleats, they are 1" knife pleats, above them will be 1/2" knife pleats and below some 1" rufflles. I made these pleats using a "Pleater" board that I made which I will follow up with a tutorial on how I made it and how to use a little later. The black stitches are just basting to hold everything together before the final sewing. I like using a darker thread so that I can see where i needs to be pulled out more easily.


I have finished the embroidery for the bodice top of the dress. It was a total pain and I admittedly cried several times when there were snags or mishaps in the positioning and hooping. Just like in regular embroidery you have to hoop the fabric for machine embroidery. You want everything to be perfect and precision. The embroidery itself only does a set of two flowers at a time, There was a lot of trial and error to figure out how to hoop over previous embroidery without making the frame pop out of the hoop. I also started with no stabilizer and a single basting stitch down the length. Both were bad calls. After the first two sets were done I knew I needed at least a tear away stabilizer to help keep the hoop from popping out against the slippery organza. Then I also added rows of horizontal basting stitches across the first length wise basting stitching to give the two layers of organza more stability. After that it was all about marking and repositioning before the next set of flowers. One time my heart stopped as I was working on it and the boy didn't realize I was there and turned the lights off which also turn the power off in the studio.


like figuring out my closure if I want it to be hook and eye tape, invisible zipper or what. Also since this is strapless how to keep it up. I think I am going to use a combination of lingerie elastic that has the slightly sticker side like on strapless bras and maybe retro fit a strapless bra into it as well.


The full dress so far and I really am not that tall! It had been so long since I tried to put my pieces together I forgot the end of the inner layer of organza was the hem bottom and the pleats needed to be about 8-12 inches higher. but you get the idea. I also tried on the extra crinoline that my cousin got at her wedding to see the fullness for once I am done.

Lastly I got this fantastic gem in the mail! It is my replacement for a veil, I am going to attach a birdcage type veil to it and hotfix Swavorski rhinestones to it. You can buy it already blinged out on Etsy but I knew I could do that and didn't want to pay that full price. In honestly I could of done the entire thing myself but it felt dirty to copy someone else's work even if it was just once for the wedding. I felt I needed to at least buy the base and help support another artist out. This headpiece can be found here!
Tuesday, March 29, 2011
Wording
It really didn't take me as long as I thought it would to find the right word's for our Save the Date and Invitations. Which is good but it still doesn't make me want to do my own vows.
Please Save the Date!
Andy and Esther
Are getting Married!
Lorem 0th, 2011
~WOOT~
Details to follow with Invitation
Then for the Invitations:
I made a promise, Mr Frodo. A promise. "Don't you leave him Samwise Gamgee."
And I don't mean to. I don't mean to.
~ Lord of the Rings
Please honor us with your presence
as we make our own promise to never leave each other’s side.
Andrew Clayton Hall
And
Esther Myong Chung
Saturday the Lorem Ipsom of August
two thousand and eleven
At two o’clock in the afternoon
Lorem Ipsum Church
2070 Lorem Ipsum
Upper Arlington, Ohio
With reception to follow at
Lorem Ipsum Delor Sit
311 Lorem Ipsum
Columbus, Ohio
Thing's Decided
Here are some final things decided on for the wedding and reception.
Colors. (ignore the yellow it is supposed to represent an old gold)

Centerpieces. Almost like mini terrariums with the single Airplant. Height added with the glass cylinder filled with moss underneath. Very simple and clean.
We had a little party with our coordinator and the bridesmaid who could make it and my photographer. They had all the materials and we got to just play and figure out what I wanted my centerpieces to look like. It was one of the best things ever!
We had a little party with our coordinator and the bridesmaid who could make it and my photographer. They had all the materials and we got to just play and figure out what I wanted my centerpieces to look like. It was one of the best things ever!


And addition decoration around the buffet, table placement/favor table and outdoor park area. Large single air plants and potted orchids.


The Reception Venue is still the lovely North Bank Pavillion


Some hanging Jelly fish type Decoration with Blue LED's inside of the ceiling of the outside tent.


The cake is going to be White and Lemon cake with raspberry filling and almond butter cream frosting.
The design will match this.

Being married at my home church which has a very dramatic interior so it doesn't need much.

But on every 3rd aisle there are candle holders that stand about 6 ft tall. I am going to hang tissue pom pom's off of them something like two white and one green or gold stringed together per each one along the aisle.

My Ceremony Shoes which I already have and are broken in

My reception Shoes

The Save the Date Magnets printed on Chip board by letterpress

We are going to have a self made Photo booth set up.
Not sure if it will involve a laptop also or photo printer yet. It also won't be cardboard but some sort of Wooden set up to cover the tripod and laptop.
 and the picture taking area to resemble something Similar.

CHOCOLATE FOUNTAIN!

That's all I can remember for now also a Yoshi in each Bridesmaid Bouquets with Dried green Hydrangeas from our garden.


Not sure if it will involve a laptop also or photo printer yet. It also won't be cardboard but some sort of Wooden set up to cover the tripod and laptop.


CHOCOLATE FOUNTAIN!

That's all I can remember for now also a Yoshi in each Bridesmaid Bouquets with Dried green Hydrangeas from our garden.


Thursday, March 10, 2011
Wedding Songs list
So here is my master list of Songs for the Reception.
Wedding Songs List
Strength to Endure The Ramones
Just a Ride Jem
It’s Amazing Jem
Today the Suns on Us Sophie Ellis Bextor
Love Shack B-52’s
Bennie and the Jets
Sabatoge Beastie Boys
Love Song The Cure
Fight All Night Dance Hall Crashers
I Believe In a thing called love The Darkness
Fly me to the Moon Frank Sinatra (Daughter father dance)
Walking on Sunshine Katrina and the Waves
Can’t take my eyes off you Morten Harket
Standy By Me BB King
Friday I’m in Love The Cure
It’s good to be in Love Frou Frou
More then a Feeling Boston
Summer Loving Grease (TJ May want to sing this)
Steal Me Jupiter Sunrise (small indie band)
Joker And the Thief Wolf Mother
I’ll stop the World Modern English
Come on Eileen
Closer to the heart Rush
The Lion Sleeps Tonight Tokens
Woman Wolf Mother
Jenny 867-5309 Tommy Tutone
Baby, It’s a Fact Hello Goodbye
Sweet Caroline (Glee Version)
How deep is your Love Bee Gees
Just like Heaven The Cure
What I like about you (the ramones?)
Take on Me Sara Barielles Version & AHA Version
Do you wanna Dance The Ramones
Have you ever seen the Sun The Ramones
One Sweet Love Sara Bareilles
Love will Come through Travis
Oh, It is Love Hello Goodbye
Such Great Heights (Whichever version is best)
Welcome to the Jungle Guns and Roses (Possibly our entrance Song)
Blue Eyes Carey Brothers (First Dance as couple song)
Lucky (Glee Version)
Thank you Dido
Close to me The Cure
Tribute Tenacious D
We Belong Together Los Lobos
Somewhere over the Rainbow Israel Kamakawiwo Version
Songs that you probably can’t play but are on the list for fillers/breaks But if you can play any of them AWESOME!
Is it Any Wonder Sophie Ellis Bextor
Intergalactic Beastie Boys
Like a Prayer Madonna
Butterfly DDR
Informer Snow
Love Sick SanE (K-pop)
Everybodys Free Rozalla
Happy Boys & Girls Aqua
Music gets the best of Me Sophie Ellis Bextor
Good Vibrations Marky Mark and the Funky Bunch
Pleats in progress
I got in my 11 yards of silk Organza and now I am finding that I have run into a total block. I did another swatch of the embroidery on organza with colors to see if I like them. Then I started on the ruffles and pleats and I was totally lost. I guess it's just hard because I don't have a clear picture in my head of what I want and what I am going for.
Finally I took the time and put together a small mood board and pleat ruffle guide. I know I want three layers or pleats or ruffles and for them to vary in size. they will be covered over with a single layer of organza so you can see them but they aren't the outer section. I think that I feared to intentionally sketch it out because I didn't want to be stuck with just one things, one idea. I just need to force myself to plow through and remember this first dress may not be the last dress or the wedding dress.
So here is my current inspiration guide board on the pleats

Wednesday, February 23, 2011
Headpieces
I've fallen in love with this headpiece from BHLDN but of course I don't want to make my Bridesmaids pay $80 for something they will wear perhaps once and also for color that is not going to be flattering with them or the rest of the wedding. The colors by the way are below. Don't mind the yellow that is just supposed to represent Gold.


Now the Head bands below.


Dismantling this in my head is it most likely a wire metal frame that has a braided cord slipped over all the ends. I wish I could see better the way the middle is attached. I think it is just more of the braided ribbon/cord used to wrap around the wire head band to keep it consistent. I've figured out the best way to do this is with a thick wire. I had a really hard time searching but I think I have a super cheap solution. Originally I was tyring to find a thick base metal bezel wire but that was a total crap shot. The I realized the cheapest metal was given to me nearly every week from the dry cleaners in the form of wire clothes hangers! I think these will do the trick, they are annoying to bend so they will keep their shape, if I screw up I don't have to worry about money being flushed down the drain just grab another. It won't have that flatness I want but I'm hoping to find either a cord or make my own bias ribbon to cover it with. We shall see how this goes.

Starting the Dress

My biggest and most stressful project has officially started to take some shape. This project that I speak of is a dress for my wedding, not necessarily my wedding dress but it might be. We'll see where it goes from here.
Here is what I have started thus far. I don't think I will keep the bow at the top but who knows ones I get them into the right fabrics. This right now is my mock up for size, pleating and measurements.


The one nice thing while I am working is the Kitty's are really interested in all of it so I get company in that cold cold basement. The materials for the final will be either a silk charmeuse lining or a light weight cotton/linen blend. I know they are vastly different, it just depends how the weight of each one goes with the out skirts. The final exterior will be all silk organza.
Tuesday, February 8, 2011


Subscribe to:
Posts (Atom)